As your car ages, the headlight lenses can become cloudy, yellowed and pitted. This reduces your headlight’s ability to project light and hinders your ability to see at night, especially during inclement weather. Rather than replace your expensive headlight assembly, you can clean up the tarnished surface and smooth the pitting.
As you will see below, the results are well worth the time, effort and materials. Since we first put this article together, a few different specialized products have arrived on the market for this very task. We haven’t tried any of them, but they are likely well worth a try.
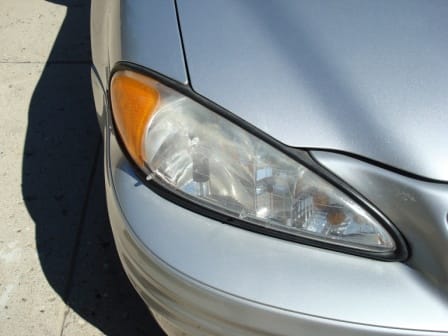
My sister-in-law left her 2001 Pontiac Grand Am at our house for a few hours and while she was away, her car became the subject of this project.
Before you start, you will need the following items:
- Mothers® PowerBall Mini™
- Cordless Drill
- Mothers® Mag & Aluminum Polish (sold through this office, US only)
- Meguiar’s® PlastX™ Plastic Polish (or similar)
- Rags or cloths
- Glass Cleaner
- Briteside Miracle Wash (optional/sold through this office)
Caution
Before starting, we recommend trying this method on an inconspicuous area of the headlight lens to make sure that you are not doing any damage. This method has worked well for us on the lights we have repaired. There may be lens types that are not receptive to this process and scratching or hazing could be the result. Please use caution before jumping headlong into this project. You may want to consider using a paint-compatible masking tape to protect adjacent surfaces like the hood, bumper or marker lights. Do not use this method on separate orange or red signal, marker or tail lights. These lenses tend to be made from a softer material and scratching will be the result.
Step One

Apply a liberal amount of the Mothers Mag and Aluminum Polish. Despite the fact that this is a chrome polish, Mothers recommends this product as the first step to smooth the heavily oxidized surface.
Step 2

Set your drill on high speed and buff the surface with the PowerBall Mini. Be sure to keep the surface wet with polish at all times. Never buff a dry surface with the PowerBall. High speed can generate too much friction and damage could be the result. The idea is not to use the PowerBall to buff the surface clean, the purpose is solely to “wet polish”. As long as you keep applying generous amounts of polish, you can apply relatively heavy pressure. Again, we trust that you have performed a trial in an inconspicuous corner of the headlight. We strongly recommend using the PowerBall Mini rather than buffing by hand. We have performed this job by hand and it can take several hours. The PowerBall Mini dramatically cuts the time needed to perform this task and is much more effective at polishing the surface. We do not sell the PowerBall Mini in Canada. We wouldn’t recommend using the full-sized Mothers PowerBall (which is sold through this office), as you would not have the precision needed to perform this job properly. We found our PowerBall Mini at Wal-Mart.
Step 3

Frequently buff the surface clean to check your progress. Perform steps 1, 2 and 3 as many times as necessary until you see significant progress.
Step 4

Once the majority of the oxidized surface is buffed clear, it is time for some fine polishing. Apply a product like Meguiar’s® PlastX™ to the surface. Mothers does make a plastic polish, but this is another item that we do not have access to in Canada. We found the PlastX product at Wal-Mart.
Step 5

Again buff the surface at high speed with your PowerBall Mini and be sure that the surface is wet at all times. Occasionally buff the surface clean with a cloth to check your work. Repeat steps 4 and 5 until you feel that you have finished.
Step 6

Do a final cleaning with glass cleaner or Briteside Miracle Wash. We like Miracle Wash because it repels rain and slush and leaves a brilliant shine.
You are done and the results speak for themselves. Good luck!